
The Canon EOS R10 can be used as a webcam in one of two ways.
The cheaper way is to use the right USB cable (not provided with the camera) and use the Canon EOS Webcam Utility Pro.
The better quality method is to use a capture card like the Elgato Cam Link 4K and a clean HDMI output.
Here’s a quick overview of the post…
💡 There’s two ways to use your EOS R10 as webcam for streaming:
- You can use a capture card like the Elgato Cam Link 4K. (I personally recommend this method) 🏅
- Connect your EOS R10 to the capture card using a Micro HDMI cable,
- Use a clean HDMI output on your EOS R10.
- Use the feed from your Elgato Cam Link 4K on your streaming software of choice on your computer.
OR
- You can use the EOS R10 as a webcam using the Canon EOS Webcam Utility Pro and a IFC-100U USB cable:
- Install Canon EOS Webcam Utility Pro
- Connect your EOS R10 to your computer using the IFC-100U cable.
- Use a compatible video call / streaming application
I prefer to use the capture card method since you get better resolution and it pays off over time.
Table of Contents
Using HDMI Capture Card and a Clean HDMI output.
Here’s a table of the things you’ll need to make this method work.
| Essential | Optional |
|---|---|
| Canon EOS R10 | USB Gen 3 to USB-C adapter or USB-C Hub |
| Elgato Cam Link 4K | Dummy Battery Kit (for constant power) |
| Micro HDMI to HDMI cable | Elgato Key Light Air (best lighting for streaming) |
How to Use Canon EOS R10 as a Webcam Using a Capture Card
Here’s a guide on how to use your Canon EOS R10 as a webcam using a capture card and a clean HDMI output.
- Get an Elgato Cam Link 4K (capture card).
Don’t bother with the cheap stuff, they’re unreliable and when I’ve tested them I get problems with choppiness and frames being dropped.
- Get a Micro HDMI cable to HDMI cable (not included with camera).
- Use the small end of the Micro HDMI cable and plug it into your Canon EOS R10’s Micro HDMI port.
You can find this Micro HDMI port on the left-hand side of the camera under a flap.
- Plug the other side of the HDMI cable into your Elgato Cam Link 4K. Connect your Canon EOS R10 to the Elgato Cam Link 4K using the Micro HDMI cable.
- Put your Canon EOS R10 into movie mode.
- Enable a clean HDMI output on your Canon EOS R10. Do this by pressing the INFO button until all the overlays and icons are gone.
- Plug the Elgato Cam Link 4K into your computer into a USB 3.X port.
If you don’t have one and only have USB-C / Thunderbolt ports then read the next section about compatibility for some solutions.
- Your setup should look a little like this
- Computer -> Elgato Cam Link 4K -> Micro HDMI to HDMI cable -> Canon EOS R10
- Select the Elgato Cam Link 4K as your video feed in your webcam application.
And there you go, it’s done.
You’ve got yourself some high quality webcam footage coming straight from your EOS R10.
Compatibility
The Elgato Cam Link 4K works with Windows and macOS as follows:
- Windows 10 (64-bit) or later
- macOS Big Sur 11 or later
You’ll also need to make sure you have a USB 3.x (also known as USB Gen 3) port on your computer or laptop. This can be USB 3.0, 3.1, 3.2.
You can tell it’s 3.x because it has blue internal plastic in the port but a standard USB port just has standard black/grey/white plastic
If you only have USB-C or Thunderbolt ports on your computer like on some newer Macbooks or laptops then you can still use it but by using a specific adapter.
In this case, you need a USB 3.X to USB-C adapter. Get either a single adapter or if you’re like me then get an adapter hub.
- USB Gen 3 to USB C adaptor
- Anker 7-in-1 USB-C hub (this is what I use with my Macbook Air M1)
Basically you’d plug the Elgato Cam Link 4K into the USB 3.X port on the adapter then plug the adapter into your computer.
As long as you get the right adapter it will work fine. I’ve tried it.
Max Resolutions
Here are the frame rates and resolutions you can get on the Cam Link 4K.
- 4K (3840×2160) up to 30 fps
- 1080p (1920X1080) up to 60fps
- 720p (1280 x 720) up to 60 fps
- 576p (720x 576) up to 50 fps
These resolutions and frame rates are more than enough for using the Canon EOS R10 for live streams and video calls.
I would personally use 1080p at 30fps or 60 fps for streaming or video calls. 4K will be overkill for most people.
Screen Turns Off During HDMI Output On The Canon EOS R10
Due to power saving options on the Canon EOS R10 your HDMI output might go blank after a few minutes.
But there’s a way around this by adjusting the power-saving options on your EOS R10.
Here are some of the power-saving settings on the Canon EOS R10 and what they do:
- Screen dimmer – When the screen dims
- Screen off – When the screen turns off
- Auto power off – When the camera turns off after being left idle
- Viewfinder off – When the viewfinder turns off after being left idle
To disable the power saving options on your Canon EOS R10 do the following:
- In your camera menu go to the Set-up menu (this is the yellow wrench icon)
- Go to page 2 of your set-up menu.
- You should now see the ‘Power Saving’ option. Select this.
- Here you can disable all of the power-saving options so that your camera or the camera screen doesn’t turn off abruptly while you are using a HDMI output for streaming or video calls.
Just make sure you have a well-charged battery when you’re doing this or use a dummy battery kit for constant power supply.
Using USB Cable and Canon EOS Webcam Utility Pro
Here’s a table of the things you’ll need to make this method work.
| Essential | Optional |
|---|---|
| Canon EOS R10 | Elgato Key Light Air (best lighting for streaming) |
| Canon EOS Webcam Utility Pro | Dummy Battery Kit (for constant power supply) |
| IFC-100U USB Cable |
Ok so this method requires you to install the Canon EOS Webcam Utility PRO and connect your Canon EOS R10 to your computer using the IFC-100U cable.
Then your Canon EOS R10 should be ready to use as a webcam or live streaming device using the Canon EOS Webcam Utility Pro.
When the Canon EOS R10 was first released in July 2022 it wasn’t compatible with the EOS Webcam Utility Pro, but now in 2023 it is compatible.
The free version gives you some limited features and paid version currently costs $4.99 paid monthly or $49.99 paid yearly.
Compatibility
Before you download the EOS Webcam Utility Pro make sure you know whether it’s compatible with your device or not.
At the time of writing (May 2023) the EOS Webcam Utility PRO is compatible with the following OS:
- Windows 10 and Windows 11
- macOS 12, 11, 10 (including intel and Apple silicon Macs)
The IFC-100U USB cable is basically a USB-C to USB-C cable.
If you don’t have any USB-C ports on your computer then you may want to either get an adapter or an alternative cable which is USB-C to USB A 3.0.
- USB-C to USB adapter (to use alongside IFC-100U)
- USB-C to USB A 3.0 cable
Max Resolution
If you use the free version of the Utility you have a maximum resolution of digitally upscaled 720p.
If you use the paid version of the Webcam Utility Pro you can get a max resolution of digitally upscaled 1080p.
Max Frame rate
The max frame rate on the free version is about 30fps and the max frame rate on the paid version is 60fps
How to setup and use Webcam Utility Pro on Canon EOS R10
Installing Canon EOS Webcam Utility Pro for Canon EOS R10:
- Go to the Canon EOS Webcam Utility Pro Page.
- Scroll down to the section where it shows the list of compatible cameras.
- Click on the EOS R10 and you should be taken to the product support page for the Canon EOS R10.
- Click on the ‘Software and Drivers’ tab.
- You should now be automatically scrolled down to the ‘Downloads’ section.
- Here choose your Mac or Windows operating system.
- E.g. I’m currently using macOS 12 so this is what I would select.
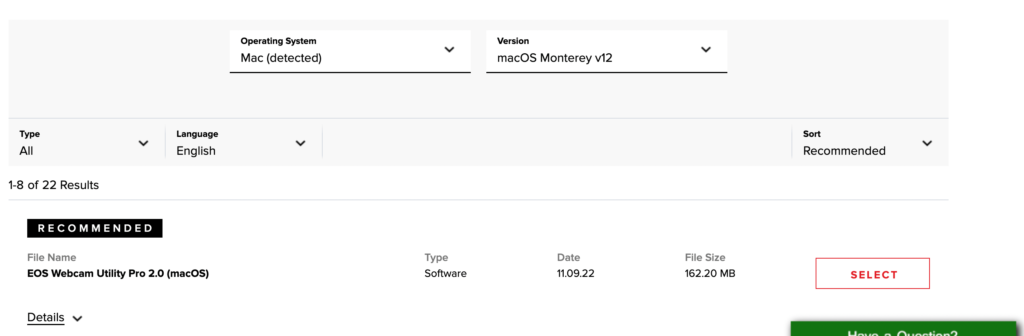
- Then you should see the available downloads for the Canon EOS R10 for your operating system.
- Find either EOS Webcam Utility Pro 2.0 (macOS) or EOS Webcam Utility Pro 2.0 (Windows) and download it by following the instructions provided.
- Once you’ve completed the installation, restart your computer.
Setting up Canon EOS R10 to work with the webcam utility.
- Make sure your EOS R10 is set to movie mode and not to any of the photographic stills modes.
- Connect one side of the IFC-100U cable to your Canon EOS R10 through its USB-C port on the side.
- Plug in the other side of the USB cable to your computer through a USB-C port so that your Canon EOS R10 can be connected to the computer.
- Now open up your video conferencing software of choice:
- This could be anything like Zoom , Skype OBS Studio, etc. (I’ve got a more detailed list further below)
- Locate the Webcam Utility as a video feed in your chosen webcam app and select it as your preferred choice.
- Hey presto, you’ve got yourself some high quality visuals using your Canon EOS R10 as a USB webcam.
Troubleshooting
If you’re having issues getting the webcam utility to work then try the following troubleshooting steps:
- Turn off WiFi on your Canon eos R10 and other wireless settings.
- Make sure any other Canon utility’s are not active on your computer.
- Make sure EOS Webcam Utility is not being used in another video app.
- E.g. maybe you used it in Skype and are now trying to use it in OBS Studio.
- Make sure your camera privacy settings on your Windows or Mac device allow access for your apps. Sometimes camera usage is restricted by default and you need to give access to your chosen webcam apps.
Compatible Applications with EOS Webcam Utility Pro
At the time of writing in May 2023 the following applications are compatible with the Canon EOS Webcam Utility Pro.
- Cisco Webex
- Discord
- Facebook Live
- Hangouts
- Hangouts Meet
- Messenger (Facebook)
- Microsoft Teams
- Open Broadcaster Software (OBS)
- Skype
- Slack
- Streamlabs
- YouTube Live
- Zoom
You should be able to use any of these applications for your video calls or live streams using the Canon EOS R10.
Comparing the Two Methods
Quality – Elgato Wins
On the free version of the Canon Webcam Utility you max out at digitally upscaled 720p.
And even if you pay for the pro version you only get up to 1080p digitally upscaled.
But on the Elgato Cam Link 4k you get 4K resolution up to 30fps, and 1080p up to 60fps. But it’s proper 1080p, not digitally upscaled.
So quality wise the Elgato wins for sure.
Audio – Elgato Wins
Audio wise the Elgato Cam Link is also a better choice because you can choose any input whether it’s the camera’s own internal mic, or the laptop, or any other mic attached to your computer.
The EOS webcam utility doesn’t let you use any audio from the camera whether that’s the internal mic or an external mic attached to the camera.
Price – Webcam Utility (Wins…Kinda)
Ok, so the webcam utility is slightly cheaper because you use a USB cable and nothing else (unless you pay for the pro version of the utility).
If you just get the free version then of course the EOS Webcam Utility wins in price.
But if you do pay for the pro version then within 2 years you’re paying $100-$120 (depending if you pay monthly or yearly), and at that point, the Elgato ends up being cheaper anyways but the Elgato is much better quality.
So if you definitely want 1080p or higher resolution, I’d probably opt for the Elgato Cam Link 4K anyways.
After all, if you are going to be using this for 2 or more years then the EOS Webcam Utility keeps getting more costly for you.
How to Decide Between the Two Methods
Just want a quick easy way to use your Canon EOS R10 for 720p video calls and live streams without breaking the bank?
Then use the EOS Webcam Utility plus USB cable method.
If you definitely want 1080p resolution or more then use the Elgato Cam Link 4k method.
FAQ
Does the Canon EOS R10 Work with Elgato Cam Link 4K?
Yes, even though it doesn’t show up on the Elgato website as compatible, this is because they don’t always update the compatibility checker with the newest models.
I’ve tested the Canon EOS R10 briefly and it has no problem working with the Elgato Cam Link 4K.
Further Resources and related reading:
- Canon EOS Webcam Utility Pro
- Canon EOS R10 Support Page
- IFC-100U Cable
- Canon EOS R10
- Micro HDMI Cable
- Elgato Cam Link 4K
- Dummy battery kit for Canon EOS R10
If you don’t fancy getting yourself a capture card or using Canon’s utility, you can use the Canon EOS R50 as a webcam with just a USB cable and no additional software.
And it can do up to 1080p resolution too.
- Check out this Canon EOS R50 Webcam Guide to find out more.
If you need to consider differences between the R50 and the R10 read this post linked below: