
The Canon EOS Rebel T7 (also known as the EOS 2000D) does not have a native time-lapse function like the Rebel T7i. I repeat, this post is not about the Rebel T7i but about the Rebel T7.
A common way (and probably the best way) to do a time-lapse on the Rebel T7 is to use an intervalometer, but you need to be careful to get the right intervalometer for your Rebel T7.
You don’t want to be sticking the wrong thing into the wrong hole.
Luckily there is another method to do a time-lapse too.
We cover all the ways you can create a time-lapse using the Canon Rebel T7 in this post with step-by-step info and links to any products you will need.
Table of Contents
Summary
There are 2 main ways to do a time-lapse on the Canon EOS Rebel T7.
- Method 1: Take a sequence of pictures on your Rebel T7 using this intervalometer and stitch them together into a video file. (Harder method but the best result.)
- Method 2: Record video at normal speed, then speed up the footage. (Easier method but the result is not as good)
There’s another method that you can use on other cameras, but not on the Rebel T7.
The other method involves using a native time-lapse function on the camera itself, but unfortunately, this isn’t available on the Canon Rebel T7.
So… What is a time-la… just kidding, you know what a timelapse is. Let’s get straight to it.
Method 1. Use An External Intervalometer
This is the most time-consuming method but it will give you the best result by far. Use this method if you can.
With this method you’re gonna have the most flexibility, control and quality of all the methods.
You don’t have to worry about a recording time limit. You can edit each frame to a large degree. And you can include motion blur by controlling the shutter speed.
Instructions:
In this method, you will use an intervalometer which will help you to take multiple pictures at a fixed interval for a period of time.
Then you will stitch them together to create a beautiful time-lapse video.
After that, you have the editing part of the process and this depends a bit on what editing software you use, so I won’t get into too much detail on that side of things.
First of all, you need to get a specific intervalometer that will work with the Canon Rebel T7 as there are different intervalometers that will work with different cameras.
The intervalometer below works with the Canon Rebel T7:
Once you’ve got your intervalometer you should make sure you also have a tripod.
If you are going to have your camera take lots of photos from the same spot over a period of time then you definitely don’t want to be going handheld.
If you don’t already have a tripod for your Rebel T7 then the Manfrotto tripod below is a solid option:
Now you’ve got your intervalometer and tripod, it’s time to figure out how long you want the time-lapse to be, how many shots you need and how often you need to take a picture.
Don’t worry it’s not too difficult.
Calculating Intervals And Length Of Time-lapse
It might sound complicated but it’s quite easy when you know how to do it. Luckily there are also a few time-lapse calculators you can use to help you.
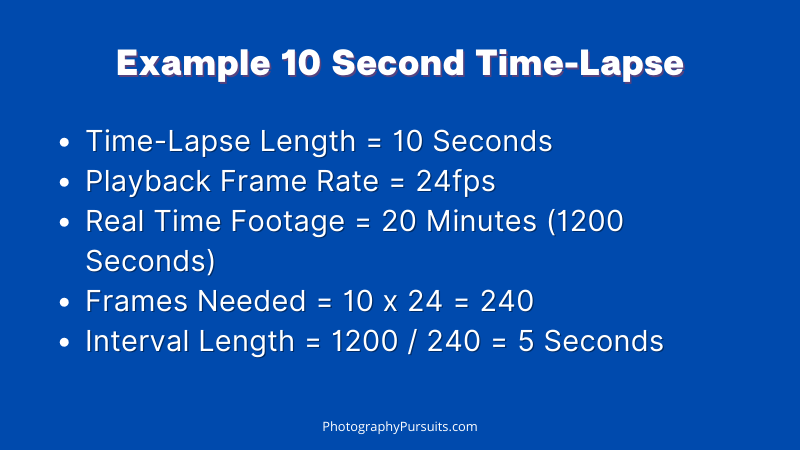
Let’s take an example where you want a 10-second time-lapse, which is played back at 24 frames per second, and the actual time in real-time would have been 20 minutes.
If you want 10 seconds of video footage at 24fps, you need to multiply the two together to get the amount of ‘frames’ you need in total.
So 10×24 = 240 frames is what you will need for your 10-second time-lapse at 24fps.
If you wanted a 10-second time-lapse at 30fps then you’d need 300 frames.
Now, move on to the real-time footage that you are capturing.
Remember we are capturing 20 minutes of real-time footage which is equal to 1200 seconds.
So you have 1200 seconds of real-time footage and you will be taking 240 individual frames within this timeframe to get your 10-second time-lapse.
💡 To find the interval between photos for your time-lapse, you gotta divide the length of time of real-time footage by the total number of frames you will need.
So you do 1200 seconds of real-time footage divided by 240 individual frames:
- 1200 / 240 = 5
This means your interval should be 5 seconds.
So now your camera will take one photo or ‘frame’ every 5 seconds for 20 minutes.
This will result in 240 frames total which can be played back in a video file for a total of 10 seconds at 24 frames per second.
See the graphic below for a summary of the calculations above:
The last thing you need to consider is whether your memory card will have enough space for your time-lapse.
Memory Card Requirements For Time-Lapse
All you do for this is take the average size of your photo files on your Rebel T7 then multiply that by the number of frames you need.
I’ll use the same example above with 240 frames and show you how this varies for JPEG and RAW files.
When I use the Rebel T7 I shoot in RAW, and this gives me a maximum file size of about 30.3 MB.
This will vary depending on what you are photographing, but it’s better to use an upper estimate than a lower estimate.
So for 240 frames in RAW file format at 30.3MB each, I do the following:
- 240 x 30.3 = 7272MB

So I need just over 7GB of spare memory on my card for this example. For me, this would be fine because I always use at least a 64GB SD card.
Now let’s consider JPEGs.
On the Canon Rebel T7 if you are shooting in JPEGs only and are using the highest quality file format for JPEGs then your maximum file size should be around 7.5 MB. (find out more about file sizes on the Rebel T7 here).
For 240 frames of high-quality JPEGs at 7.5MB each you would need to do the following:
- 240 x 7.5MB = 1800MB
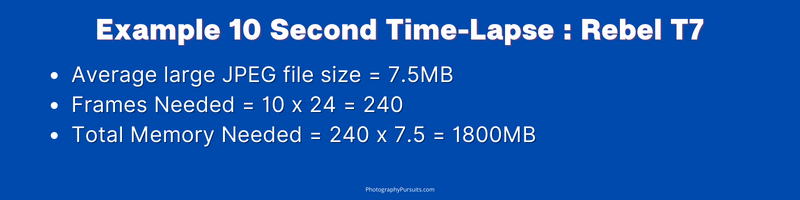
So in this example, you’d need just about 1.8GB of spare memory on your SD card.
Of course, if you wanted a longer time-lapse or higher frame rate you would need more memory because you need more frames.
If this stuff is too confusing then just use a time-lapse calculator to take the stress away.
If you want a time-lapse calculator then you can use the ones I’ve made on this site for free.
You could also use the calculators made by Photopills or Omnicalculator.
💡 Tip: Your interval time must be longer than your shutter speed. If your shutter speed is slower than your interval time then the camera will still be taking the first picture when the time for the next picture is already here. In the example above with the 5-second interval, the shutter speed MUST be quicker than 5 seconds.
Get The Frame Right
Now that you’ve got all your equipment and the length of your time-lapse sorted, it’s time to pick your spot and get your exposure set up correctly.
In my experience, the best way to do a time-lapse is to use manual focus and manual mode to dial in the settings.
You want to manually focus and decide where you want the focus to be.
If you don’t do this then the camera will keep looking for something to focus on if things are moving around in the frame. This won’t look good in a time-lapse.
Now get your exposure right in manual mode so that everything can stay consistent.
If you choose aperture priority or shutter priority, you run the risk that the camera changes the exposure too much between shots and the frames don’t have a consistent exposure. This can lead to an annoying flickering effect in your time-lapse.
Of course, there are times when aperture priority or shutter priority can be useful like when the lighting conditions are definitely going to be changing (e.g. sunset or sunrise).
So it can be worth playing around with these modes, but to start just use fully manual settings to get used to time-lapses.
💡 Tip: Turn off any vibration control or any image stabilization settings when doing a time-lapse to reduce the chance of ‘flickering’.
Editing Process And Turning Your Photos Into A Video.
Now it’s time to get all your individual frames, edit them and put them into a video sequence.
This part of the process will vary from person to person depending on what editing software you are using, but we’ll go through the basic steps.
First, you import all of your images into your photo editing software of choice e.g. Lightroom.
Then check the photos and edit them so that they have a consistent look.
One way to go about this is to look at the first image, edit that, then paste these settings onto the last image.
If they don’t look consistent enough, then look at the second and second last images and do the same process.
Keep doing this until you have a pair of images that look consistent enough for your liking. As soon as you have a pair that look consistent, you can copy the edit to the images in the middle.
In Lightroom, you can easily apply the same edit to all of your photos by using presets or using the ‘paste settings’ function.
Once you’re happy with the edit and look of your images, you will want to export the edited versions so that you can import them into a video editing software like Adobe Premiere Pro.
When exporting in Lightroom you should be able to export them with a sequential name.
This puts them in order when exporting them and this is useful for when you import the files into your video editing software.
For example, they might be exported as something like: sunset time-lapse 1, sunset time-lapse 2, sunset time-lapse 3 etc.
When you import the frames into your video editing software as a sequence, make sure you have the right settings for your video file.
If you remember our example above, we were using a 24 fps playback, so in that scenario, you would want to make sure that your video file is set up to play in 24 frames per second.
Once all of your images are imported in the right order into your video editing software, you should have a time-lapse video ready to be shared with the world.
Of course, at this stage, you can make any further edits to your file as you would to any video file before you export it.
Now you’re done. It can be a long process but this method is easily the best method.
Benefits Of This Method
- Best quality
- Can introduce motion blur by controlling shutter speed for visual effect
- Can do longer periods of time because you don’t have to worry about recording time limits
- More editing capabilities with individual frames
Negatives Of This Method
- Even though there is no recording time limit you might run out of battery or SD card space.
- No audio.
- Can be a lengthy process.
Method 2: Record Video Then Speed Up The Footage
Seriously, it’s that easy. If you just want to do a rough and ready time-lapse and you’re not too fussed about getting the best result possible then this is an easy method to try.
Instructions:
First, you record the video for as long as you want. Then you just speed it up in your editing software for the time-lapse effect.
Example:
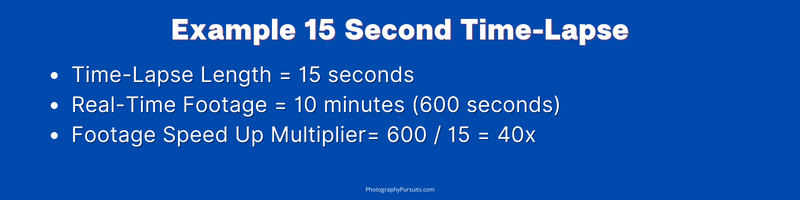
You want a 15-second time-lapse from 10 minutes of real-time footage.
Record 10 minutes of real-time video footage. Then put your video file into your video editing software of choice. Speed up the footage so that it is only 15 seconds of footage.
10 minutes of real-time footage is equal to 600 seconds.
You would need to speed this 600 seconds of footage by 40x to make it playback in a time-lapse lasting 15 seconds.
💡 Important tip: Make sure to use manual focus so you can lock your focus on one specific subject. Also, use manual settings so the time-lapse will have a consistent look throughout the video.
If you leave the camera in autofocus then the camera might switch focus randomly and this always makes a time-lapse just look a bit weird.
Benefits Of This Method
- Personally, I think the biggest benefit of this method is just how easy it is. I mean you just press record then speed it up later.
- Another benefit is that you do still have the audio from the original footage. But this isn’t that important because you rarely use the original audio in a time-lapse and instead you’d probably put some other soundtrack over the time-lapse.
- As well as the audio you do actually have the real-time footage. So if you wanted to use that video footage for another purpose at normal speed then you can do so.
Of course, even though there are some benefits there are definitely some downsides.
Negatives Of This Method
- Because it is just standard video footage, there is less motion blur because your shutter speed is more limited.
- You also end up having a bigger file size because it is a video file, but less quality compared to other methods.
- Having to speed up 20 minutes of video down to a few seconds can make your computer work really hard too.
- The biggest issue is probably the recording limit though, especially if you need to record a large passage of time.
A lot of DSLRs have recording limits and the Canon Rebel T7 has a recording limit too.
Method 3: Using A Native Time Lapse Function On The Camera
This method consists of using an option in the camera which lets you take time lapses automatically.
Unfortunately, this is not available on the Canon Rebel T7, but it is available on the Canon Rebel T7i.
So now you know how to do a time-lapse on your Rebel T7, but when should you even do one?
FAQ
When Should You Use A Time-lapse?
Time-lapses are useful in adding dramatic effect in videos but are specifically good for showing the passage of time.
For example, you’ve probably seen in some TV shows where they do a time-lapse of day to night or night to day to show the passing of time before they move to the next scene.
In other scenarios, it can just be good to show the franticness of a scene, like a busy intersection or city scene.
Showing everything sped up can add a dramatic effect to emphasise how everything is moving super fast.
Time-lapses are also useful just to have a bit of a visual break from real-time footage because it keeps things a bit fresh for the viewer.
Time lapses just look cool too. So use them.
Can You Use An Intervalometer With The Canon Rebel T7?
Yes, even though the Canon Rebel T7 does not have a built-in intervalometer you can use an external intervalometer with the Canon Rebel T7, but you have to make sure you get the correct type.
Intervalometers are not universal so you need one that specifically works for the Canon Rebel T7.
The Intervalometer linked below works with the Canon Rebel T7:
Should I Use JPEG Or RAW For Time-lapses?
Ideally, you should use RAW images for time-lapses instead of JPEGs. That’s what I do.
This is because time-lapses can be over a large period of time and lighting conditions can vary drastically.
By shooting in RAW you have more flexibility to control your edits so that your time-lapse can still look consistent and well put together even if the lighting has changed quite a bit.
That’s not to say it’s impossible to get a time-lapse with JPEGs. If you like JPEGs you like JPEGs, it’s your life.
Of course RAW files do take up a lot more memory space so that’s something to consider especially if you are going to need a really large number of frames for your time-lapse.
Related Videos:
If you need a bit more visual guidance then I’ve linked some videos below that I’ve found useful.
Related Reading:
If you’re interested in making videos with your Rebel T7 you probably should know whether the Rebel T7 has an external mic input or not.
As we mentioned earlier you also need to pay attention to recording limits on the T7 if you are recording video for a long period of time.
Make sure you also know what lenses are compatible with the Rebel T7 if you’re thinking of upgrading your lenses.