
You take some amazing shots on your phone or camera…
You edit it to perfection.
Then you upload it to Instagram and it looks like you used a camera from the 90s.
It looks like poop and you’re wondering why your Instagram photos are so low-quality
This used to happen to me, but I learnt the secrets of Instagram, so I can now post photos to Instagram without losing quality.
Here’s a quick summary of what you need to do:
- Enable the high quality upload setting
- Resize your image and export with the best settings
- Turn off any cloud storage optimisation on iPhone
- Use a decent camera or a phone with a decent camera
Summary : Best Export Settings For Instagram
- Square Image: 1080px width (short or long edge)
- Vertical Image: 1080px width (short edge)
- Horizontal Image: 1080px width (long edge)
- Colour Space: sRGB
Table of Contents
How To Enable The High Quality Upload Setting
If this setting is off then instagram will not upload your photos at the highest quality, so that it can upload faster.
If you make sure that you enable this setting then Instagram will upload your photos at the highest quality even if it takes longer.
This is particularly useful if you have a slow internet connection whether that’s WiFi or mobile data.
It can be useful even if you normally have a fast internet connection because there are always times when the connection can drop a bit.
Instructions for IOS
- Press the burger menu at the top right
- Select ‘Settings’
- Select ‘Account’.
- Select ‘Data Usage’
- You should see an option that says ‘Upload at highest quality’ or ‘High quality uploads’. Make sure this option is enabled.
Instructions for Android
- Press the burger menu at the top right
- Select ‘settings’
- Select ‘Account’.
- Select ‘Mobile data use’
- You should see an option that says ‘Upload at highest quality’ or ‘High quality uploads’. Make sure this option is enabled.
Now Instagram should not limit your post quality if your connection is slow.
Resize Your Image So Instagram Doesn’t
Instagram doesn’t like certain sizes of images.
So we need to work with it.
For the highest quality uploads to Instagram, you want to make sure that your upload has:
- a width of between 320 pixels and 1080 pixels
- a height of between 566 pixels and 1350 pixels
- an aspect ratio of between 1.91:1 and 4:5.
Don’t worry if this sounds confusing I’ll explain what you need to do.
Basically if your photo is higher resolution than what Instagram wants then it will compress and resize it.
And if your photo is lower resolution than what Instagram wants then it will enlarge it.
The main takeaway is that you need to meet Instagrams requirements so that they dont mess around with your image.
In practice the best settings will be as follows:
- Use a width of 1080 pixels (short edge or long edge depending on orientation)
- An aspect ratio between 1.91:1 or 4:5
You have to be careful with the 1080 pixels for the width if you are using settings like short edge or long edge.
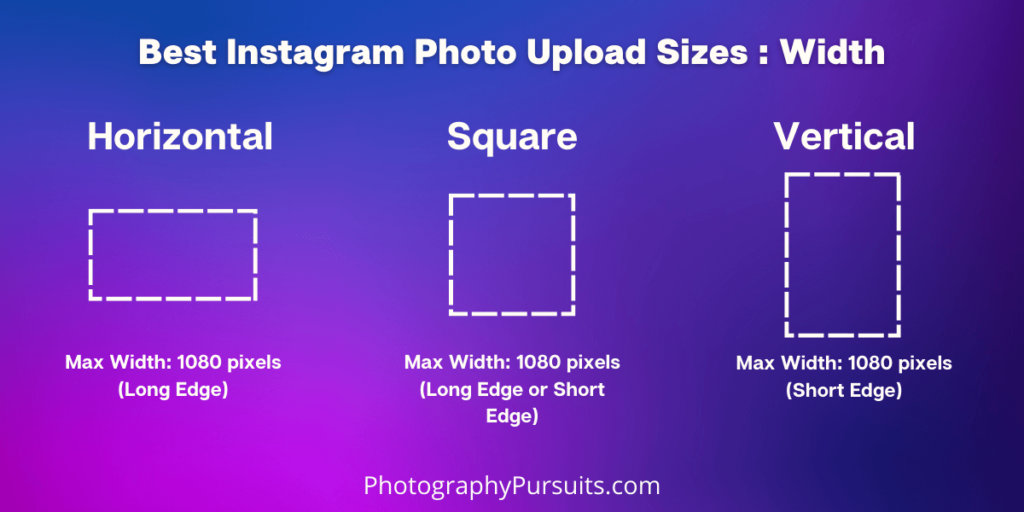
Short Edge or Long Edge?
When exporting your images in different photo editing apps you may be asked to choose the short edge or long edge and to set a pixel limit for it.
Whether you use the short edge or long edge to set your image to 1080 pixels depends on your aspect ratio.
If you are using a portrait format (where the height is longer than the width) then set the short edge to 1080 pixels.
If you are using a landscape format (where the width is longer than the height) then set the long edge to 1080 pixels.
If you are using a square format (where the height and width are the same) you can use short edge OR long edge and it wont make a difference.
Look at the graphic below to see what I mean by this.
Here’s a link to the Instagramhelp page which tells you all about the right resolutions to use for your photo uploads to Instagram.
How To Resize Images For Instagram
To resize images for instagram you need to use some sort of photo editing app or tool.
There are a lot of photo editing apps you can use but here are some of the most popular ones:
- Adobe Express
- Adobe Lightroom **(this is what I use)
- Adobe Photoshop
- Snapseed
- VSCO
- Instasize
- Pixlr
- picsart
You can pretty much use any of the above for image resizing but I use Adobe Lightroom because it’s what I’m used to.
Cloud Storage Settings Ruining Instagram Photo Quality
For some people using iPhones, your cloud storage settings can be ruining your Instagram uploads.
If your iPhone is low on storage then your photos and videos are automatically replaced with lower resolution versions (the full resolution versions are still in cloud storage).
Basically your phone might be compressing your image before you’ve even uploaded it to Instagram!
Now imagine if this happens AND you haven’t been using the right image sizes , then Instagram may be resizing your upload too.
Nobody wants that double whammy low resolution bonanza.
This should only really happen if your phone is low on storage space, but here’s how to stop this from happening:
- Go to your ‘Settings’ on your iPhone
- Scroll down to ‘Photos’ and select it.
- Now you should see an option that says ‘Optimise iPhone Storage’. Make sure this is unchecked.
This should fix any issues with your phone using lower resolution files.
To be extra careful, if you’re using other cloud storage providers like Google Drive or Dropbox, make sure that they are not compressing your files too.
What Colour Space To Use?
Colour space may be something that people forget but it can be an extra way to have more control over your image.
There’s different colour spaces that exist but for the purposes of this quick guide you need to know that you will want to export in sRGB.
This is because sRGB is a colour space which most digital media devices can display so you know it will be consistently shown across different devices.
The main aim here is maximising compatibility.
If you can’t see any options for colour space in your photo editing app then don’t worry about it too much.
How To Export Correctly For 4:5 Ratio
The 4:5 aspect ratio is used A LOT on Instagram because it gives you the most screen real estate for photos.
So I thought I’d include a separate section just for this.
It should be fairly simple with most photo editing apps that are used.
In lightroom for example, you simply set the crop to 4:5 making sure that the longer side is the vertical edge.
Now go to export the image and do the following:
Limit the short edge to 1080px.
Change the ppi to 72ppi since you won’t see any noticeable difference by putting it any higher than this.
Leave the quality at 100%. Instagram will upload at full resolution if the width is 1080px so you don’t need to worry about file size.
Use a Decent Camera
This is self explanatory, but using a better camera should give you better results.
Pretty much any DSLR or mirrorless camera will give you amazing results for Instagram, but you can also just use your smartphone.
If you’re looking for the phones with the best cameras then here are the top picks for 2023.
- Google Pixel 7 Pro
- Samsung S23 Ultra
- iPhone 14 Pro / iPhone 14 Pro Max