
If you are wondering if you can use the Canon M200 as a HDMI webcam then this post will help you.
The answer is yes. You can use your Canon EOS M200 as a webcam using a HDMI output and a capture card.
All you need is:
- The correct HDMI cable
- A suitable capture card
- A compatible webcam application
This setup is going to be perfect for anybody wanting to step up the quality of their video calls or live streams.
Table of Contents
How Do I Use My Canon EOS M200 as a HDMI Webcam?
It’s not as easy as just downloading one piece of software.
To summarise, the set-up we recommend is as follows:
- Connect your Canon EOS M200 camera to a capture card using a ‘Micro HDMI to HDMI‘ cable.
- Plug the capture card into your computer.
- Use a suitable webcam software (like OBS or Zoom) and use the feed from the capture card for high quality video for video calls or live streaming.
- Enable clean HDMI for best results.
This post will guide you through the above steps in further detail and provide you with helpful tips to make sure you get the most out of this setup.
What about Canon EOS Webcam Utility?
You can also use the Canon M200 as a webcam using just a USB cable and the Canon EOS Webcam Utility software.
However, that method produces a lower quality video compared to using a HDMI cable and a capture card.
To find out more about the alternative method check out our post on how to use the M200 as a USB webcam.
If you’re not sure which method is right for you then read our post that goes through the differences between using the the Canon M200 as a webcam with USB vs HDMI.
- Related Reading: Best Methods to use the Canon EOS M200 as a Webcam – USB VS HDMI
What Accessories Do I Need to Use My Canon EOS M200 as a HDMI Webcam?
To use your Canon EOS M200 as a HDMI webcam you will need a few accessories for different things.
- Essential – Micro HDMI (HDMI D) to HDMI cable (HDMI A)
- Essential – Capture Card (we recommend the Elgato Cam Link 4K)
- Essential – Webcam software e.g. Zoom, Microsoft Teams, OBS Studio
- Optional* – HDMI Extension cable
- Optional but recommended* – AC Adapter with Dummy Battery / DC Coupler
- Optional* – Tripod
Essential Accessories
1. Micro HDMI to HDMI cable
You will need this to connect your Canon EOS M200 to your capture card.
The small side is the Micro HDMI (HDMI Type D) and the larger side is the standard HDMI (HDMI Type A).
2. Capture Card (we recommend the Elgato Cam Link 4K)
The capture card will be outputting the footage straight from your Canon EOS M200 to your video calls or streams via HDMI.
We recommend the Elgato Cam Link 4K as Elgato is a reputable company which has a compatibility checker too.
The Elgato Cam Link 4K is also a recommended product because it uses a UVC driver.
This basically means it is universally compatible with any conference software that is able to use webcams e.g. Zoom, Skype or OBS Studio.
Below you can see a screenshot from Elgato’s website showing compatibility with the Canon EOS M200.
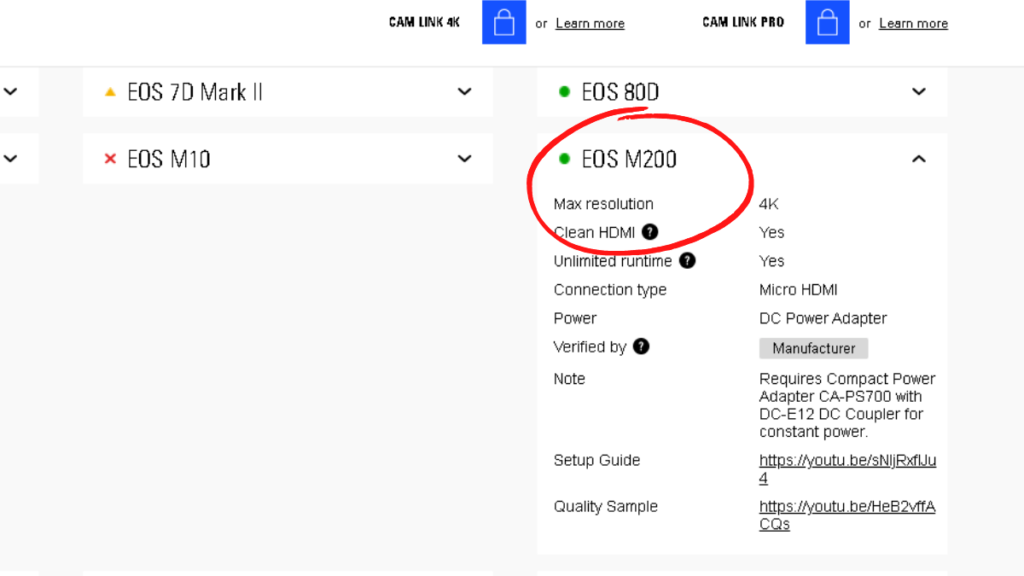
To check for yourself you can go to this Elgato camera checker link, search for Canon and go to the EOS M200.
You can check the current price and availability for the Elgato Cam Link 4K on Amazon at the link below.
3. Webcam software e.g. Zoom, Microsoft Teams, OBS Studio
This is up to you what you use, but you will need a webcam/streaming software.
The Elgato Cam Link 4K should work with most popular webcam or streaming software.
For extra information, you can check out Elgato’s page for ‘Supported Software for the Cam Link 4K’.
Optional Accessories
1. HDMI Extension cable
This is only necessary if you need a long cable length from your camera to the capture card.
Most people should be fine with just the Micro HDMI to HDMI that we linked earlier.
If you think the Micro HDMI to HDMI cable you have is too short for your setup then you will want to get a HDMI male to female extension cable.
It will allow you to basically extend the length of cable between your camera and the capture card.
E.g. A Micro HDMI to HDMI cable fits into the female side of the HDMI extension cable and the male side fits into the capture card.
Tip: To reduce the need for this, get a Micro HDMI to HDMI cable that is already long enough on its own.
2. Recommended* – AC Adapter with Dummy Battery / DC Coupler
This is arguably essential if you are streaming or using the M200 for a long period of time.
If you plan to stream for a prolonged period of time then your battery will run out.
The AC adapter uses a dummy battery in the battery compartment of the camera and allows your camera to have continuous power (so it won’t be using the standard LP-E12 batteries that you would normally use).
This will ensure that you will not run out of power when streaming on the Canon EOS M200.
The kit linked below is compatible with the Canon EOS M200.
Remember that you should use the dummy battery that comes with this AC adapter kit and not your original batteries if you are plugging this in.
Tip: If you are having trouble trying to plug it in, keep in mind that there is a little flap where the battery compartment is on the M200.
Open the little flap so that you can plug the jack into the dummy battery while still keeping the main battery compartment closed.
3. Tripod
If you are going to be streaming or using your camera as a webcam you need somewhere stable for it to be positioned.
If you don’t already have a tripod then you may want to invest in one as they can provide more flexibility to your set up.
- Neewer Table Top Tripod – if you need to place your tripod on your desk or table.
- GorillaPod 3K – if you need a lot of flexibility you can attach this to pretty much anything.
- Manfrotto Tripod – if you have more space in your room and don’t mind having a larger tripod.
What Software Do I Need to Use My Canon EOS M200 as a HDMI Webcam?
To use the Canon EOS M200 as a webcam or for live streaming you will need software that is compatible with the capture card you decide to use.
The Elgato Cam Link 4K is universally compatible with any conference software that is able to use webcams, like Zoom or Skype.
You can also use the Cam Link 4K with popular streaming software like OBS Studio.
To read more about compatibility with the Cam Link 4K check out the following link ‘Supported Software for the Cam Link 4K’.
If you decide to use a different capture card then please check the compatibility for that specific capture card with the webcam/streaming software that you intend to use.
Set up the Canon EOS M200 with a Capture Card
- Make sure your camera has enough battery or set up the AC adapter so that your camera can receive constant power.
- Use your Micro HDMI cable to connect your camera to the capture card. The small side of your Micro HDMI cable should go into the Micro HDMI port on your Canon EOS M200. The larger side can go straight into the Elgato Cam Link 4K.
- Plug the Elgato Cam Link 4K into a USB 3.0 port on your computer (these USB ports are blue on the inside) .
- Open your webcam software on your computer and make sure your camera is turned on.
- Select the appropriate setting so that the Elgato Cam Link 4K is your chosen video feed. (This will depend on the software you decide to use but you can use the Elgato help website for assistance).
- Now you should see a direct feed from your Canon EOS M200 on your webcam/streaming software. Adjust your camera settings to suit your preference.
- If you can see lots of icons etc. on your video feed then that means you need to set your camera up to have a Clean HDMI feed.
To make the most of this set up you also want to make sure you have the ability to use a Clean HDMI feed on your Canon M200.
This basically means that the camera can output what it can see without having all of the icons from the user interface such as the frames per second, battery life etc.
Luckily the Canon EOS M200 does have Clean HDMI.
This is actually one of the major benefits for the M200 compared to some older Canon cameras which did not have ‘Clean HDMI’.
How to Enable Clean HDMI on the Canon EOS M200
To enable a clean HDMI feed on the Canon M200 you need to do the following:
- Make sure your camera is in movie/video mode.
- Go to your ‘Menu’.
- Go to page 5 of the ‘shooting settings’ menu. This menu has an icon of a camera body and has a red theme.
- On page 5 there should be an option which says ‘HDMI info disp’. Select this option.
- Choose either ‘Clean / 4K output’ or ‘Clean FHD output’. We recommend the FHD output as this will provide you with 1080p footage which is more than enough for a webcam or livestream. The 4K option crops in, so if your camera is placed close to you this can be an issue.
- Now your Canon EOS M200 should output a clean HDMI feed. This will also automatically disable the ‘auto power off’ function of the camera where the camera turns off after a while automatically (perfect for streaming!).
The video below shows you how to do this in easy steps and also shows you how to increase the length of time that the display stays on.
Further Resources
Below are some links that may be of extra assistance.
You might also like our post on the differences between the USB and HDMI method of using the Canon M200 as a webcam.
Related Reading:
If you want to use a Canon camcorder as a webcam instead then check out the post linked below.
You might also want to know what the recording limits are on the M200.