
Under normal circumstances, the Canon EOS M50 will autofocus onto a subject when you ‘half-press’ the shutter button.
After the half-press, you can press the shutter button fully down to take the picture.
For the majority of people, there are never any problems with this.
But sometimes your Canon EOS M50 just won’t autofocus how you want.
There are a few reasons why your Canon EOS M50 may not be focusing.
Some of the reasons have easy fixes but some are harder and potentially more costly to fix.
The reason your Canon EOS M50 is not focusing could either be one of the following or a combination of them.
We have described 8 possible solutions in this post.
Table of Contents
1. Check That The AF/MF Switch Is Set To Auto Focus
On your lens or camera body, you will have a switch that should let you switch between AF/MF (auto-focus and manual-focus).
If your switch is set to MF then your camera is set to manual focus which may be the reason why it is not utilizing autofocus to focus.
Switch your camera to AF so that autofocus is enabled.
Remember that this is not to do with auto vs manual mode in terms of exposure. This is just auto vs manual mode for focus.
2. Camera Is Too Close To The Subject
All cameras and lenses have a minimum focusing distance.
This basically means that in order to focus on something the subject has to be at least a certain distance away from the focal plane mark on the camera.
You can find the focal plane mark on the camera body. It is also known as the film plane indicator.
It looks like a circle with a line going straight through it.
Different lenses have different minimum focusing distances.
If you are trying to photograph something that is closer than the minimum focusing distance of your lens then your Canon M50 will struggle to focus.
Try moving the subject further away or stepping away from the subject to see if the camera is now able to focus.
If your Canon EOS M50 is still unable to focus, then it is likely to be one of the other reasons on this list.
3. The Lens Might Not Be Attached Correctly
The lens and the camera body have contacts that allow them to communicate with each other.
This is how autofocus is able to work.
If the lens and camera body are not attached correctly then the contacts may not be aligned in the right way.
This would stop the lens and body from communicating correctly.
With no communication between the two parts, autofocus is impossible.
Try to remove the lens and reattach it correctly by doing the following:
- To align the lens correctly look for the white circle on your Canon lens.
- Align the white circle on your lens to the same circle on your Canon EOS M50 camera body where the lens will be mounted.
- Now attach the lens and rotate it clockwise until the lens locks into place.
- The lens should click into place and not be loose.
If your lens does not seem secure you may have an issue such as a loose screw on the body or the lens.
A quick way to tell if this is an issue on your camera body or your lens is to try it with a different lens and see if there is an issue with all lenses or just one.
Get this checked out by a camera repair shop or Canon service center if you do notice that the lens is not attaching correctly.
If you have reattached your lens and it seems fine but autofocus is still not working then it could be another issue.
4. Contacts Need Cleaning.
This solution follows from the previous issue about the lens and body communicating.
The camera and lens communicate through metal contacts.
The lens and camera may attach together and seem secure but the contacts may still need addressing.
If these contacts are dirty or damaged then information cannot be passed accurately between the camera body and the lens – stopping autofocus from working.
You can either take your equipment to a camera repair shop to have them clean it or you can try it yourself.
The contacts on the lens and camera body are delicate. If you’re not careful, you can damage and ruin both, which can be very costly.
Below are some cleaning instructions directly from this Canon support page.
“If the contacts on either the lens side or the camera side get dirty, communication cannot be carried out correctly, and in some cases the autofocus may not operate correctly.
If the lens or camera contacts get dirty, please clean them very gently with a clean, dry cloth.
CAUTION
Precautions on cleaning contacts:
- Do not wipe the contacts with a wet cloth. It could cause malfunctions.
- Do not touch the contacts directly with your hands. Touching them with your hands could cause corrosion, which would cause the camera to become inoperable.
- When cleaning the contacts on the lens side, be careful not to damage the lens surface.
- If the contacts are particularly dirty, please contact the nearest Canon Service Center.”
If you feel uncomfortable doing this yourself it is recommended that you take it to a camera repair shop or an authorized Canon service center.
5. Not Enough Light
In low-light situations, cameras tend to struggle to autofocus because of the lack of contrast between lights and darks.
One way around this is to allow more light into the camera.
You can do this by using a wider aperture.
E.g. f/1.8 will let in more light than f/4.
You can also slow down the shutter speed.
E.g. Shutter speed of 1/60 will let in double the light as 1/120
Some other ways you can help with focus in low light is by adding some artificial lighting to the scene.
- Shining a laser on the subject (DO NOT point this at someone’s eyes)
- Turn a flashlight on and point it at the subject
- If the subject is a person then ask them to hold a smartphone screen up.
- Use lighting such as an external flash or a softbox.
The video below demonstrates some of these tips above.
If you are using the flashlight, laser, or smartphone trick, you are mainly using these just to lock the focus in the same focal plane as your subject.
You would then turn the light/laser/smartphone off and take the photograph with the correct exposure.
6. Your Subject Is Moving
In specific circumstances, you might not be able to autofocus because the subject is simply moving too fast for the camera to react.
This is mainly an issue if the subject is moving between different focal planes.
If the subject is moving towards you or away from you then it is constantly changing focal planes.
If the subject is moving parallel to you then it is staying in the same focal plane.
For example, in sports photography, air shows, and bird photography the subjects may be moving quite fast across different focal planes.
By the time your EOS M50 focuses on the subject, the subject may move into a different focal plane – so the autofocus cannot work effectively.
One simple fix is to check that you are using the correct autofocus mode.
On a Canon EOS M50, there are different AF operation settings.
The AF operation settings are:
- One-shot AF – use this for still subjects.
- Servo AF – use this for moving subjects. Continuously tracks a moving subject to focus.
If you are photographing moving subjects, set your camera to Servo AF and see if you are now able to focus on your subject.
How to set your Canon EOS M50 camera to be in Servo AF mode:
- Press the ‘Q SET’ button.
- Select the autofocus setting then choose Servo from there. The autofocus setting should show as ‘One Shot’ or ‘Servo’ on the left-hand side of the screen.
You can also do the following.
- Go to your camera menu
- Navigate to the shooting settings menu (This is the red menu with a camera icon)
- Go to page 6 of the ‘shooting settings’ menu.
- Select ‘AF Operation’
- Set this to ‘Servo’’
The video below has more information about the EOS M50 Autofocus settings.
7. Check the Custom Function Settings
As we mentioned at the start, autofocus normally works by half-pressing the shutter button to lock in the focus.
If you have changed some of the settings on the camera by accident this may not work.
To check you have the correct settings do the following:
1. Go to your Settings Menu
2. Navigate to the ‘Set up Menu’ ( this is the yellow wrench icon)
4. Under the ‘Set up’ go to page 5. It should say ‘set up5’ in the corner of your screen.
5. Select ‘Custom Functions(C.Fn)’
6. Navigate to ‘C.Fn IV: Operation/Others C.Fn-5: Shutter/AE lock button’ It should look like the image below.
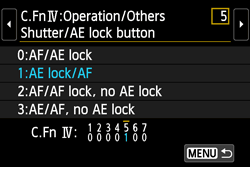
7. Make sure that this setting is not on 1 or 3. It should be set to one of the following:
- “ 0: AF/AE lock ”
- “ 2: AF/AF lock, no AE lock “
Now try taking images as normal and it should hopefully work.
8. Clean Your Lens
It may be that everything is functioning fine in your camera but your lens or sensor needs a bit of a clean.
If you have got a thumbprint, some grease or anything else on your lens then that can blur your image.
To get around this get yourself a camera cleaning kit and give your lens a clean and you should be back to having sharp, in-focus images.
Here’s a video to help you with the cleaning.
Conclusion
Hopefully, by going through this list you have corrected any issues with your autofocus struggles on your Canon EOS M50.
If there are still issues then it is recommended that you get your camera and lens seen by a camera repair shop or a Canon service center.
If you manage to get your Canon EOS M50 camera to start focusing but it still can’t take pictures or takes a long time, then you might like the following post: