
The Canon EOS Rebel SL3 (also known as the EOS 250D) comes with a native time-lapse feature but there’s also other ways to do a timelapse on it where you can have more control.
In my opinion, the best way to do a time-lapse on the Rebel SL3 is by using an intervalometer.
Just make sure that you get the right intervalometer though.
Cameras don’t like it when you put things in holes they’re not meant for.
I’ll cover all the info you need with easy to follow instructions and any links you need to products.
Summary:
Ok, so there’s 3 ways to do a timelapse on the Rebel SL3.
- Method 1: Use this intervalometer to take a sequence of high-quality pictures and put them together in a video file (Harder method but the best result and most control.) This is what I would do.
- Method 2: Record the video, then speed it up. (Easier method but the result is not as good)
- Method 3: Use the built-in timelapse feature of the Rebel SL3 to create a video time-lapse (Easier than method 1, but better results than method 2)
Rebel SL3

Probably one of the best entry-level crop-sensor DSLRs you can get in 2023.
So the history of time-lapses starts in the year…just kidding, let’s get into what you really want to know.
Table of Contents
Method 1. Use An External Intervalometer (Top Pick)
Even though this method takes the longest, it’s my favourite way of doing time-lapses because it always gets the best results.
And maybe I just like the pain of editing for ages too.
With this method, you’re gonna have the best flexibility and control as well as the juiciest time-lapses.
You don’t have to worry about a recording time limit which is something you do have to worry about for both other methods. Yikes.
Motion blur, the shutter speed, and the edit of each frame are completely in your hands.
You can see why I love this method the most.
Instructions:
- In this method, you will use this intervalometer which will let you take multiple photos, at a fixed interval, for a period of time.
- Then you will put them together in the right order to create a time-lapse video file.
- After that, you have the editing part of the process and this depends a bit on what editing software you use, so I won’t get into too much detail on that side of things.
The first thing you need to do is get the right intervalometer for the Canon Rebel SL3 (250D) because there are different intervalometers that work with different cameras.
The Canon Rebel SL3 (250D) can use the intervalometer below:
Once you’ve got your intervalometer you should make sure you also have a tripod.
Doing a time-lapse means you almost definitely want to use a tripod.
The only exception really is if you want to do a hyper lapse where the camera is moving positions constantly between frames.
If you don’t already have a tripod for your Canon Rebel SL3 (250D) then the Manfrotto tripod below is a solid option:
Now you’ve got your intervalometer and tripod, you need to figure out:
- How long you want the time-lapse to be
- How many shots you need
- The interval between each picture.
It’s all simple maths and it’s pretty easy to do.
Calculating Intervals And Length Of Time-lapse
You can calculate intervals and the length of time lapses using a calculator or by doing the maths yourself.
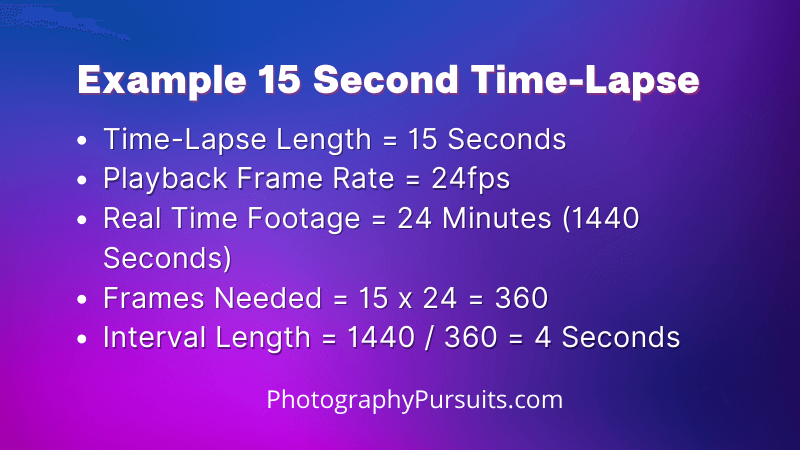
Let’s say that I want the following:
- 15 second time-lapse video
- I want it to be played in 24 frames per second
- I want the footage to be about 24 minutes worth of real-time footage
First, let’s find the total amount of frames (pictures) we’ll need in this scenario.
For this, I need to multiply the frame rate by the length of time I want the time-lapse to be…
So I do the following:
15 seconds x 24 frames per second = 360 frames
So I need 360 frames for this particular 15 second time-lapse.
If I wanted say 30 seconds instead, then I’d need double the number of frames because the time lapse would need double the amount of frames.
Ok, now I know how many frames I need, time to think about the intervals.
I want 24 minutes of real-time footage and this equals about 1440 seconds
So I have the following information now:
- 24 minutes (1440 seconds) of real-time footage
- 360 frames needed
- 15 second timelapse video
💡 To find the interval between photos for your time-lapse, you gotta divide the length of time of real-time footage by the total number of frames you will need.
So you do 1440 seconds (24 minutes) of real-time footage divided by 360 individual frames:
- 1440 / 360 = 4
This means your interval should be 4 seconds.
Your Canon SL3 should be taking one frame, every 4 seconds, for 24 minutes.
This will result in 360 total frames, which can be played back in a video file for a total of 15 seconds at 24 frames per second.
See the graphic below for a summary of the calculations above:
The last thing you need to check is whether your memory card has enough space for your time-lapse
Memory Card Requirements For Time-Lapse
To Figure out the memory requirements you need to find the file size of each frame taken on your Canon Rebel SL3 (250D), then multiply this by the number of frames.
I’ll use the same example above with 360 frames and show you how this could vary for JPEG and RAW files.
If I shoot in RAW on the Canon Rebel SL3, this gives me a maximum file size of about 30MB assuming I use an ISO of 100.
If you have higher ISO, the amount of noise increases, which increases detail and file size.
E.g. If you have a very high ISO like 25600 you can get up to file sizes of almost 45MB.
So for 360 frames in RAW file format at 30MB each, I do the following:
- 360 x 30MB = 10,800MB
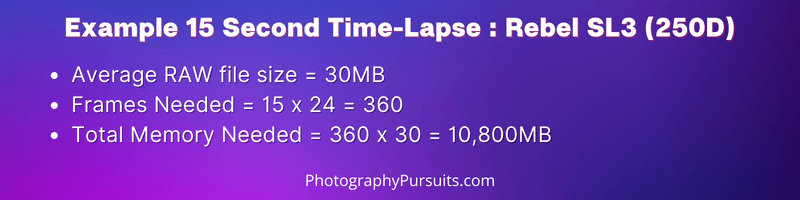
So I need at least 11GB of spare memory on my memory card for this example. For me, this would be fine because I always use at least a 64GB SD card.
Let’s have a look at using JPEGs instead.
If you are only shooting JPEGs and using the highest file quality for JPEGs, then your maximum file size should be around 7.5MB.
At least that’s what I’ve experienced when using the SL3.
For 360 frames of high-quality JPEGs at 7.5MB each you would need to do the following:
- 360 x 7.5MB = 2700MB

So in this example, you’d need just about 2.7GB of spare memory on your SD card.
Just remember that if you want a longer time-lapse or higher frame rate then you’ll need more frames (and this means more memory).
If this stuff is too confusing then just use a time-lapse calculator to take the stress away.
If you want a time-lapse calculator then you can use the one I’ve made, or you can use one by photopills or omni calculator.
- Photographypursuits time-lapse calculator
- Omnicalculator Time-lapse Calculator
- Photopills time-lapse calculator
💡 Tip: Your shutter speed can’t be slower than your interval time.
In our 4 second interval example, you should make sure the shutter speed is faster than 4 seconds.
Otherwise, the camera will still be taking the first picture by the time it’s meant to start taking the next picture!
Get the exposure right
As a quick summary here’s what you should do to get the exposure right for a consistent look throughout your time-lapse.
- Use manual focus so the camera doesn’t go hunting
- Use manual settings for ISO, Aperture and shutter speed
- Turn image stabilization off if using a tripod
When I do time-lapses I always use manual focus and manual mode for the settings.
Manual Focus
If you use autofocus then the camera will keep looking for something to focus on if things are moving around in the frame. This will look weird in your time-lapse.
Manual Settings
After setting your focus, get your ISO, aperture and shutter speed dialled into how you like it.
By manually setting these, the images from frame to frame can have a more consistent look.
If you use a different mode like aperture priority or shutter priority, then the camera might change the exposure too much between shots.
If this happens then the individual frames won’t have a consistent look. This can lead to an annoying flickering effect in your time-lapse (which you definitely don’t want).
💡 Tip: Turn off any vibration control or any image stabilization settings when doing a time-lapse to reduce the chance of ‘flickering’.
If you think lighting conditions are going to change very drastically then you might actually want to use aperture priority.
For example, day-to-night or night-to-day time lapses have a massive change in lighting conditions.
If you just used fully manual settings for these situations then some of your timelapse will either be way too bright or way too dark.
So it can be worth playing around with aperture priority or shutter priority modes, but to start just use fully manual settings to get used to time-lapses.
Editing Process And Turning Your Photos Into A Video.
As a quick summary here’s what you will be doing in this step:
- Importing your photos into a photo editing software like Adobe Photoshop or Lightroom
- Editing your photos so they have a fairly consistent look that you’re happy with
- Exporting your edited photos
- Importing your edited photos into a video editing software
To start, import all of your unedited photos into your photo editing software of choice (e.g. I use Adobe Lightroom).
Then check the photos and edit them so that they have a consistent look.
A good way is to go end to end.
What I mean is you look at the first image and the last image, and edit them and see if you can get them to be consistent.
Then go to the second and second last images to see if you can get them to look consistent enough with your edits.
Keep doing this until you have a pair of images that look consistent enough for your liking.
Once you have a pair that look good together, go ahead and paste the settings of your edits onto the images in between.
In Lightroom, you can use the ‘paste settings’ function to get the same edit across multiple images.
When you’re happy with the edits, it’s time to export the photos.
Export them using a ‘sequential’ name if possible, this automatically puts them in order by file name.
For example, they might be exported as something like:
- sunset time-lapse 1
- sunset time-lapse 2
- sunset time-lapse 3
- etc.
When you’re importing your files into your video editing tool, make sure you’ve got the right settings for your video file.
If you want a 24fps playback then make sure your video file is set up that way.
Once the images are imported your time-lapses are basically ready. If you want to go ahead and edit the video file further feel free to do so.
Now you’re done. It can be a long process but this method is easily the best method if you want full control.
Benefits Of This Method
- Best quality
- Can introduce motion blur by controlling shutter speed for visual effect
- Can do longer periods of time because you don’t have to worry about recording time limits
- More editing capabilities with individual frames
Negatives Of This Method
- Even though there is no recording time limit you might run out of battery or SD card space.
- No audio.
- Can be a lengthy process.
Method 2: Just Speed Up a Video File
Instructions:
Record a video.
Speed it up in your editing software for the time-lapse effect.
It’s not the best. But it’s easy.
Example:
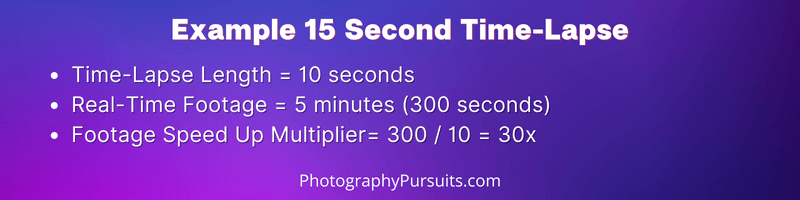
- You want a 10-second time-lapse from 5 minutes of real-time footage.
- Record 5 minutes of real-time video footage.
- Speed up the footage so that it is only 10 seconds of footage.
- 5 minutes of real-time footage is equal to 300 seconds.
You would need to speed this 300 seconds of footage by 30x to make it playback in a time-lapse lasting 10 seconds.
💡 Important tip: Use manual focus so your camera is not hunting for focus throughout your time-lapse.
Benefits Of This Method
- The biggest benefit of this method is how easy it is. You just record and then speed it up afterwards.
- You still have the audio from the original footage. (but I guess you normally put a different audio track over time lapses anyways.)
- You can still use the real-time footage for other purposes.
There are some downsides to this method too.
Negatives Of This Method
- You can’t introduce motion blur if you wanted to because the shutter speed is more limited when recording video.
- Video files have large file sizes so they can be awkward to deal with.
- Your computer can get really slow depending on how much footage it is trying to speed up.
- You have to pay attention to the recording limits of the Canon Rebel SL3 (250D)
Method 3: Using A Native Time Lapse Function On The Camera
Unlike some other cameras, the Canon Rebel SL3 (250D) does have a built-in intervalometer to do time-lapses and it can create a video time-lapse in 4K or Full HD depending on what you want.
All you have to do is set the interval and the number of frames you want.
You can also choose if you want the camera to automatically change settings throughout the time-lapse or just use the settings that you set for the first frame.
To use the built-in intervalometer on the Canon Rebel SL3 do the following
- Make sure the mode dial on your SL3 is set to any mode apart from the ‘ Special Scene Mode’ and the ‘Creative Filters’ mode. They look like this…
- Go to page 2 of your shooting settings menu on your Canon SL3. This menu has a red camera icon. It should say “SHOOT2” in the top right of your screen.
- You should see an option called “Time-lapse movie”. Select this option.
- Choose one of the scenes provided or choose ‘custom’
- The scenes are preset modes that are made for specific types of footage
- The custom mode will give you more control and freedom over the shooting interval and the number of shots.
- Select ‘Interval/shots’ to be taken to the menu where you can set the number of shots you need and the interval you want.
- On this screen, you’ll also see the time required to take the time-lapse as well as the playback time.
- Select ‘OK’ once you’re happy with your settings.
- Now for the Movie Rec. size choose either 4K or FHD depending on what you want.
- For both 4K and FHD the time-lapse will be recorded in MP4 format.
- Now you need to choose the exposure settings under ‘auto exposure’:
- Choose ‘fixed 1st frame’ if you want the whole time-lapse to have the same settings as the first frame
- ‘Each frame’ – choose this if you want the camera to set the exposure on every frame automatically.
- Now exit the menu screen by pressing the ‘Menu’ button on your Rebel SL3.
- Press the ‘INFO’ button and check the ‘time required’ and ‘playback time’ which will show up on the screen
- To start the time-lapse press the live view button on your camera. It looks like the icon shown below.
💡 Things to note when using built-in timelapse feature on Canon Rebel SL3:
- You need to keep in mind that there are recording limits on the Rebel SL3. If the timelapse is going to exceed 4GB in file size then the time-lapse will automatically stop.
- No sound is recorded with this time-lapse feature
- Time-lapse movies can’t be recorded on the Canon Rebel SL3 (250D) if the camera is connected to a computer with an interface cable or when an HDMI cable is connected.
- Autofocus will not work when using this timelapse feature. (this is a good thing)
Can You Use An Intervalometer With The Canon Rebel SL3 (250D)?
Yes, even though the Canon Rebel SL3 (250D) does have a built-in intervalometer, you can use an external intervalometer with the Rebel SL3.
I recommend that you do this because you will get a bit more control over the final product.
The intervalometer linked below works with the Canon Rebel SL3 (250D):
Related Videos:
If you need a bit more visual guidance then I’ve linked some videos below that I’ve found useful.
Related Reading:
If you plan to do videos on the SL3 then make sure you know whether the Canon Rebel SL3 has an external mic input or not.