
You can use your Panasonic HC-V180 (also known as the Panasonic HC-V180K) as a webcam to live stream, but it’s not as easy as just downloading one piece of software.
This method lets you use your Panasonic HC-V180 camcorder as a HDMI webcam to live stream with a clean HDMI output.
To summarise, the set-up we recommend is as follows:
- Connect your Panasonic HC-V180 camcorder to a capture card using a ‘Mini HDMI to HDMI’ cable.
- Plug the capture card into your computer.
- Use a suitable webcam software (e.g OBS) and use the feed from the capture card for high quality video for video calls or live streaming.
- Enable clean HDMI for the best results.
This post will guide you through the above steps in further detail.
We also provide you with helpful tips and the best settings to make sure you get the most out of this setup for live streaming.
Table of Contents
Can I use the Lumix Webcam Software for the Panasonic HC-V180?
You may see online that you can use the LUMIX Webcam Software (Beta) to use Panasonic cameras as webcams…
However, this is not true for the VC-180 as the LUMIX Webcam Software is only compatible with the following models.
- DC-S1H
- DC-S1R
- DC-S1
- DC-S5
- DC-GH5S
- DC-GH5
- DC-G9
- DC-G100/G110
As you can see the Panasonic HC-V180 is NOT on the list of compatible models above. This is why we use a capture card instead.
What Accessories Do I Need to Use My Panasonic HC-V180 as a HDMI Webcam?
To use your Panasonic HC-V180 as a HDMI webcam you will need a few accessories for different things.
- Essential – Mini HDMI (HDMI C) to HDMI cable (HDMI A)
- Essential – Capture Card (we recommend the Elgato Cam Link 4K)
- Essential – Webcam software e.g. Zoom, Microsoft Teams, OBS Studio
- Optional but recommended* – Continuous Power
- Optional* – Tripod
Essential Accessories
1. Mini HDMI to HDMI cable
You will need this to connect your Panasonic HC-V180 to your capture card.
Normally this comes with the camcorder so you should already have this.
If you need a replacement I’ve linked one below.
The small side is the Mini HDMI (HDMI Type C) and the larger side is the standard HDMI (HDMI Type A).
2. Capture Card (we recommend the Elgato Cam Link 4K)
The capture card will be outputting the footage straight from your Panasonic HC-V180 to your video calls or streams via HDMI.
We recommend the Elgato Cam Link 4K as Elgato is a highly reputable company.
The Elgato Cam Link 4K is also a recommended product because it uses a UVC driver.
This basically means it is universally compatible with any conference software that is able to use webcams e.g. Zoom, Skype or OBS Studio.
The CamLink 4K is able to output 4K resolution video which is perfect since the HC-V180 has a max resolution of Full HD 1080p.
In addition, the Panasonic HC-V180 meets the requirements to be compatible with a Camlink 4K. The video below goes through these requirements.
You can also see a screenshot below from Elgato’s website showing that the HC-V180 is compatible.
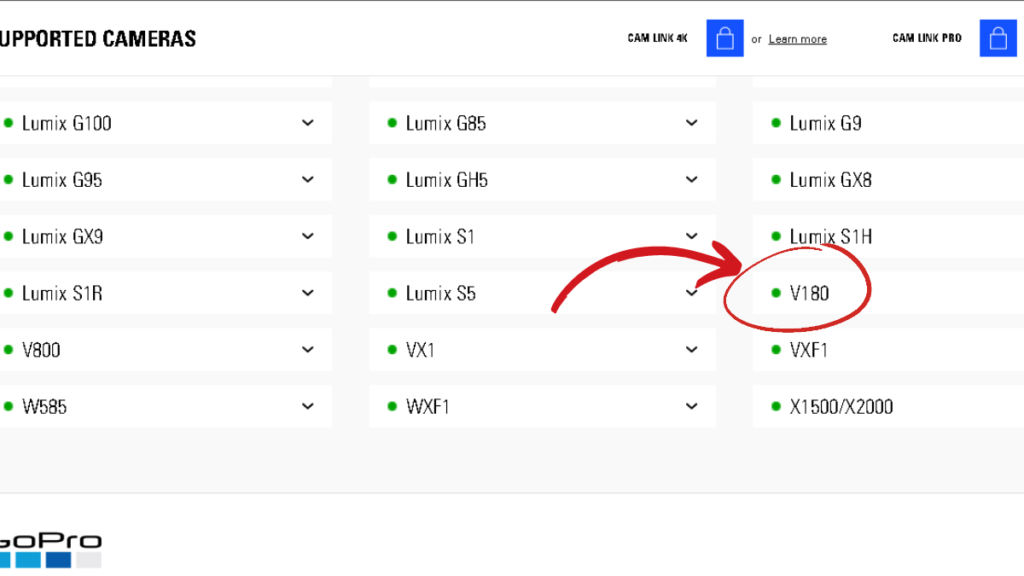
If you want to check for yourself you can go to Elgato’s camera checker go to Panasonic and look for V180.
You can check the current price and availability for the Elgato Cam Link 4K on Amazon at the link below.
3. Webcam software e.g. Zoom, Microsoft Teams, OBS Studio
This is up to you what you use, but you will need a webcam/streaming software.
The Elgato Cam Link 4K should work with most popular webcam or streaming software.
For extra information you can check out Elgato’s page for ‘Supported Software for the Cam Link 4K’.
Optional Accessories
1. Recommended* – AC Power Adapter
Having constant power is quite important if you are streaming or using the HC-V180 for a long period of time.
If you plan to stream for a prolonged period of time then your battery may run out.
The AC power adapter can be plugged into the wall allowing your camera to have continuous power.
This will ensure that you will not run out of power when streaming on the Panasonic HC-V180.
Luckily the Panasonic HC-V180 comes with a power adapter in the box when you buy it.
The Panasonic HC-V180 uses the VW-VBT190 battery pack as standard and can also use the higher capacity VW-VBT380.
Other similar Panasonic cameras also use these batteries.
If you need a spare battery or replacement then I have linked some third party replacements below for you.
You are also able to charge the Panasonic HC-V180 with the Micro USB cable which is supplied with the camera. If you need a replacement cable for this I’ve linked one below which should work too
2. Tripod
If you are going to be streaming or using your camera as a webcam you need somewhere stable for it to be positioned.
If you don’t already have a tripod then you may want to invest in one as they can provide more flexibility to your set up.
- Neewer Table Top Tripod – if you need to place your tripod on your desk or table.
- GorillaPod 5K – if you need a lot of flexibility you can attach this to pretty much anything.
- SmallRig Tripod – if you have more space and don’t mind having a larger tripod.
What Software Do I Need to Use My Panasonic HC-V180 as a HDMI Webcam?
To use the Panasonic HC-V180 as a webcam or for live streaming you will need software that is compatible with the capture card that you decide to use.
The Elgato Cam Link 4K is universally compatible with any conference software that is able to use webcams, like Zoom or Skype.
You can also use it with popular streaming software like OBS Studio.
To read more about compatibility with the Cam Link 4K check out the following link ‘Supported Software for the Cam Link 4K’.
If you decide to use a different capture card then please check the compatibility for that specific capture card with the webcam/streaming software that you intend to use.
Set up the Panasonic HC-V180 with a Capture Card
- Make sure your camera has enough battery or set up the AC power adapter so that your camera can receive constant power.
- Adjust your camera settings to suit your preference.
- Use your Mini HDMI cable to connect your camera to the capture card. The small side of your Mini HDMI cable should go into the Mini HDMI port on your Panasonic HC-V180. The larger side can go straight into the Elgato Cam Link 4K.
- Plug the Elgato Cam Link 4K into a USB 3.0 port on your computer (a USB 3.0 port is a standard USB port which has a blue colour).
- Open your webcam software on your computer and make sure your camera is turned on.
- Select the appropriate setting so that the Elgato Cam Link 4K is your chosen video feed. (This will depend on the software you decide to use but you can use the Elgato help website for assistance).
- Now you should see a direct feed from your Panasonic HC-V180 on your webcam/streaming software.
- If you can see lots of icons on your video feed then that means you need to set your camera up to have a Clean HDMI feed.
To make the most of this setup you also want to make sure you have the ability to use a Clean HDMI feed on your Panasonic HC-V180.
This basically means that the camera can output what it is recording without having all of the icons from the user interface such as the frames per second, battery life etc.
Luckily the Panasonic HC-V180 does have Clean HDMI.
This is actually one of the major benefits for the Panasonic HC-V180 compared to some other older Panasonic cameras and camcorders which do not have ‘Clean HDMI’.
How to Enable Clean HDMI on the Panasonic HC-V180
To enable a clean HDMI feed on the Panasonic HC-V180 you need to do the following on the camera:
- Go to your ‘Menu’
- Navigate to ‘Setup Menu’ (this is the wrench icon)
- Under the ‘Setup Menu’ go to page 2 and find ‘Date/Time’. Set this to ‘OFF’ to stop the date showing on the corner of the screen.
- Still under the ‘Setup Menu’ go to page 3, find ‘EXT. DISPLAY’ and set this to ‘OFF’.
- Now your Panasonic HC-V180 will output a clean HDMI feed.
You should now be ready to use your Panasonic HC-V180 as a high quality webcam or streaming device using a clean HDMI output.
There are some extra settings that you might also want to change if you haven’t already.
Some Extra Tips
Demo Mode
Demo mode means that the camera will show a demonstration of the product.
This is mainly used for when the camera is on display in shops.
If you leave the camera idle for 10 minutes without doing anything and there is no SD card (typical behaviour when live streaming), then the demo mode starts. We don’t want this during video calls or live streams.
To turn this off do the following.
Under the ‘Setup Menu‘ go to page 7, find ‘DEMO MODE‘ and set this to ‘OFF’.
Video Light
If the video light comes on and you find it annoying then you can turn this off.
Press the arrows on your screen until you find the sideways bulb icon.
Press this bulb icon until it is toggled off.
Stabilization Message ‘Camera is panning too fast’
Do note that if you have the image stabilization turned on and you move the camera really quick then you may have a warning show up on the screen briefly saying ‘camera is panning too fast’.
This shouldn’t be a problem if the camera is stationary or if you are panning slow enough.
To turn this off, first go to your ‘Record Setup’ menu (not the ‘setup’ menu).
Then find ‘Shooting Guide’ and set this to ‘OFF’.
Economy Settings
In the ‘SETUP’ menu set the the following power saving settings to ‘OFF’
- ECONOMY (BATT)
- ECONOMY (AC)
This ensures the camera won’t automatically turn off to save power in the middle of your video call or live stream.
Zoom /Rec Display
Under the ‘setup’ menu set this to ‘off’ and the icons for these settings will disappear about 5 seconds after there are no touch operations.
O.I.S. Lock Display
Under the ‘setup’ menu set this to ‘off’ and the icons for these settings will disappear about 5 seconds after there are no touch operations. The icon for this is the one that looks like a hand.
Quick Recap of Items
The 3 main items you need to use your Panasonic HC-V180 as a webcam with clean HDMI output are as follows:
- Your Panasonic HC-V180 camcorder
- A capture card
- A Mini HDMI to HDMI cable.
Further Resources
Below are some links that may be of extra assistance.
Related Reading: